In this post, we will show you how to make a floating share box for your website which in return will help you to get more traffic, leads, and conversation with the user through the use of social media. Check out through the post and find what you have learnt from it. If you have liked this post, or have any issue then please let us know through dropping a comment in comment area.
The URL and Text to Share
The first step involves a little bit of WordPress code. The code is given as follows. In footer.php in your theme, scroll down to the tag, and just before it, paste the following:

The motive of this code is to work out the right URL and title text to share, and save them in 2 PHP variables (here $url and $text).
It should be noted that the way it works or run depends on the fact “what kind of page we are working on?” So, it must be checked out; these are categorized into three categories given as under:
Single Post/Page – In this one, use the post’s URL and title.
Category/Tag – In this one, use the category/tag’s URL, and “Category on Site Name” as the text.
Default – In this one, share the homepage URL, site title and description on any other page.
Only when we are sure that we have the right URL and text then we should ensure that the right details are shared, e.g. we don’t need any utm_source= etc. tracking tags after the address etc. Now the time has to come to get the share codes.
Get the Share Codes
Now we have to get share codes for each button, and put it in HTML that we can style. This can be done in two ways, either manually or automatically. We will show you both methods, it is your choice which one you prefer to use.
Manual way

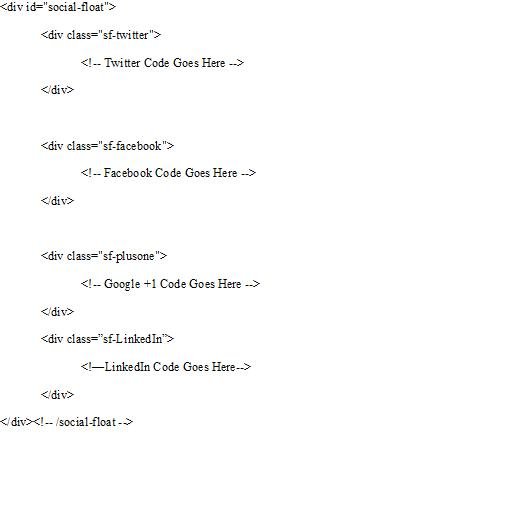
You can see HTML comments for where each share code will go. Now, let’s get those codes (And tweak them as needed)
Twitter : Click here
Choose “Vertical Count”, and enter your Twitter handle below.
Copy and paste the code.
Find the part that looks like: data-count=”vertical” data-via=”webgranth”. Take a space after that and paste: data-url=”<?php echo $url; ?>” data-text=”<?php echo $text; ?>”
Facebook: Click here
Enter http://google.com for “Address to Share”.
Deselect the “Send Button” option, choose “box_count” for layout, and set the width to 50.
Hit “Get Code” and copy and paste the iframe code (Or XFBML if you already use the FB JavaScript SDK. If you aren’t sure, just take the iframe code).
In the iframe code, search for http%3A%2F%2Fgoogle.com, and replace it with:
Search for 80 in the code, and replace it with 62 (There are 2 places to change it, both to do with the height).
Google plus One: Click here
Select the “Tall” button and then copy and paste the code.
Find where it says size=”tall” in the code, then take a space and paste: href=”<?php echo $url;?>”
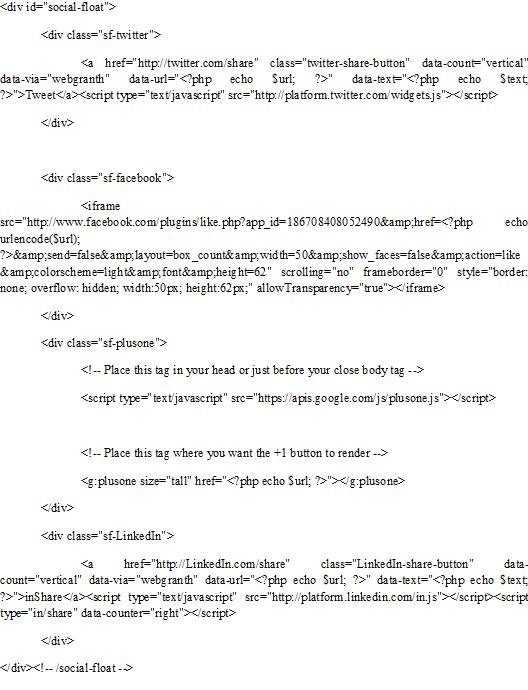
And that’s you done! Your code should look similar to what’s below.
LinkedIn: Click here
Choose “Vertical Count”, and enter your LinkedIn handle below.
Copy and paste the code.
Find the part that looks like:data-count=”vertical” data-via=”webgranth”. Take a space after that and paste: data-url=”<?php echo $url; ?>” data-text=”<?php echo $text; ?>”
Automatic Way
Copy and paste the following, but on line 3, make sure you change the data-via=”webgranth” part to use your Twitter username instead.
CSS Time
CSS is so effective that the majority of our effect can be done with just a simple piece of CSS. By using fixed positioning, we can anchor our box to the corner of the screen. It should be noted that it won’t work in IE6.
Go through the code given below: The following will put the box 10px from the bottom and left edges of their browser.

For more effective result, the following CSS will be best to apply. It makes a good template to work from.

To tweak the style, you may also change the background-color and border parts of #social-float.
We don’t want to show the box on smaller browsers because it will obstruct the post content and so, we are making attempt to hide it on smaller browsers. For this, let us use jQuery to check the browser size, and show the box only if it is wide enough, otherwise not.
First of all, make sure whether you have loaded jQuery by adding the following to your functions.php file, or to header.php. It will be loaded right before the wp_head (); tag.
<? php wp_enqueue_script(‘jquery’); ?>
Now, go back to footer.php and after our button HTML, paste the following:

Here in the above code, Lines 4 and 5 will run when the page is first loaded. They will check the width, and show the box if it is wide enough.
Line 8 is an event handler that runs when the user resizes their browser. When this task is performed, once again the lines 4 and 5 code will run resulting either hide/show the box as appropriate.
Whatever width and size has been set, you are free to change it as per your convenience. Now save your code and check it out on site. Now, with everything at a place, you may feel free to tweak the style and.
Conclusion
Now we are sure that you must be aware of creating floating share box for your websites and now your curiosity must be stopped now. We will be pleased to know your thoughts about this post. If you have liked the post please let us know it. Also if you have any issue regarding the content of this post, you may convey your message leaving a comment in the comment section. We will try our best to overcome those issues.

